Warframe: Wisp Guide – Drops, Abilities, Builds
Warframe: Wisp Guide - Drops, Abilities, Builds
Quick Links
- Obtaining Wisp
- How To Craft Wisp
- How To Craft Wisp Prime
- Wisp Abilities
- Wisp Augments
- The Best Wisp Builds
The ghostly Wisp is like the Beyoncé of Warframe. She’s got it all, offering massive health boosts, increased fire rate, and an enormous death laser as her ultimate ability. Plus, she’s one stylish frame with her ethereal appearance. Seriously, what’s not to love?
Updated July 28, 2023, by Charles Burgar: Wisp Prime has descended with the Echoes of Duviri update, featuring added mod polarities and slightly higher base stats. This guide has been updated to include Wisp Prime’s drop locations, altered base stats, and a new endgame build that takes advantage of Archon mods and endgame Arcanes.
Getting your hands on Wisp may take a bit of effort, but trust me, she’s worth it. This guide will walk you through everything you need to know about obtaining Wisp, crafting her components, and maximizing her abilities. Whether you’re a seasoned Warframe veteran or a newbie looking for a powerful support frame, Wisp is the one for you.
Obtaining Wisp

To get Wisp blueprints, including her main blueprint, you’ll need to take on the Ropalolyst on Jupiter. But before you can do that, you must complete The Chimera Prologue quest. The Ropalolyst is probably the easiest Sentient boss fight in the game, so don’t worry too much. Just make sure you’re reasonably progressed in the game to unlock the Ropalolyst node on Jupiter.
Ropalolyst Walkthrough
Before you dive into the battle with the Ropalolyst, you need to unlock the Ropalolyst node by completing The Chimera Prologue quest. Once you’ve done that, it’s time to prepare for the fight.
- Story Of Seasons: A Wonderful Life – Getting a Processing Roo...
- The Sims 4 Horse Ranch: Championship Rider Guide
- Fallout 4 Bobblehead locations
Make sure you bring a high-damage Radiation weapon with decent range. Snipers like Rubico Prime will do the trick, or anything with high single-shot damage. It’s also recommended to have a decent Amp, preferably one better than the Mote Amp. As for your Warframe choice, go for one with a damage-boosting ability and high toughness. Rhino and Chroma are ideal choices, but any tough frame will work.
The Ropalolyst fight can be summarized in two phases:
- Phase 1: Remove the Ropalolyst’s shields and make it vulnerable.
- Use your Operator’s Amp to take down the Ropalolyst’s shields.
- If it charges a beam attack, cloak with your Operator to tank the beam.
- Once the shields are down, mount the Ropalolyst by getting close and pressing the interact button.

- Phase 2: Deal damage to the Ropalolyst while it’s vulnerable.
- Shoot one of the “Syonvias” on the Ropalolyst’s hind legs to stun it and make it drop to the ground.
- Activate the nearby panel to fire the Terren Charger at the Ropalolyst and deal damage to its health.
- Repeat these phases two more times to defeat the Ropalolyst.
- Lastly, navigate through the remaining debris to extract.
Keep in mind that there’s a 25% chance of getting any given Wisp blueprint, so you may need to defeat the Ropalolyst multiple times to gather all the necessary components. You’ll also require some rare materials like Hexenon, Argon Crystals, and Nitain Extract to craft Wisp. Check out the crafting components for each part in the tables below.
How To Craft Wisp

Wisp Blueprint
| Obtained | Ropalolyst Boss (22.56% chance) |
|---|---|
| Crafting Costs | – 25,000 Credits – 1 Wisp Neuroptics – 1 Wisp Chassis – 1 Wisp Systems – 3 Orokin Cells |
| Crafting Time | 72 Hours |
Wisp Neuroptics
| Obtained | Ropalolyst Boss (25.81% chance) |
|---|---|
| Crafting Costs | – 15,000 Credits – 500 Hexenon – 1 Argon Crystal – 700 Oxium – 2,750 Alloy Plate |
| Crafting Time | 12 Hours |
Wisp Chassis
| Obtained | Ropalolyst Boss (25.81% chance) |
|---|---|
| Crafting Costs | – 15,000 Credits – 300 Hexenon – 2 Tellurium – 950 Plastids – 2,200 Polymer Bundle |
| Crafting Time | 12 Hours |
Wisp Systems
| Obtained | Ropalolyst Boss (25.81% chance) |
|---|---|
| Crafting Costs | – 15,000 Credits – 400 Hexenon – 2 Nitain Extract – 950 Rubedo – 10,000 Salvage |
| Crafting Time | 12 Hours |
How To Craft Wisp Prime

If you’re in pursuit of the prestigious Wisp Prime, her components can be acquired from Void Relics found throughout the Star Chart. You can obtain Relics by completing missions, purchasing Relic Packs from Syndicates or Teshin, or by trading with other players. The specific Relics needed for each Wisp Prime component are listed below.
Wisp Prime Blueprint
| Obtained | Axi W3 (Rare) |
|---|---|
| Crafting Costs | – 25,000 Credits – 1 Wisp Prime Neuroptics – 1 Wisp Prime Chassis – 1 Wisp Prime Systems – 5 Orokin Cells |
| Crafting Time | 72 Hours |
Wisp Prime Neuroptics
| Obtained | Meso K6 (Uncommon) |
|---|---|
| Crafting Costs | – 15,000 Credits – 2 Argon Crystals – 700 Oxium – 2,750 Alloy Plate |
| Crafting Time | 12 Hours |
Wisp Prime Chassis
| Obtained | Lith W3 (Rare) |
|---|---|
| Crafting Costs | – 15,000 Credits – 2 Tellurium – 300 Hexenon – 950 Plastids – 2,200 Polymer Bundle |
| Crafting Time | 12 Hours |
Wisp Prime Systems
| Obtained | Neo D7 (Common) |
|---|---|
| Crafting Costs | – 15,000 Credits – 2 Nitain Extract – 400 Hexenon – 950 Rubedo – 10,000 Salvage |
| Crafting Time | 12 Hours |
Wisp Abilities

Stats
| Wisp | Wisp Prime | |
|---|---|---|
| Armor | 175 | 200 |
| Energy | 200 | 200 |
| Health | 100 | 100 |
| Shields | 75 | 100 |
| Sprint Speed | 1.2 | 1.25 |
Passive
Invisible in the Air: Wisp becomes invisible to enemies while in the air.
- While airborne, Wisp is invisible to enemies.
- Using guns will break her invisibility, even silenced weapons.
- Note: The passive effect persists for a second upon landing, giving players a chance to jump again.
Reservoirs

- Choose and summon a Reservoir filled with Motes that attach to and aid Wisp and her allies.
- Each Reservoir type grants a different buff:
- Haste Mote: Increased movement and attack speed.
- Vitality Mote: Increased maximum health and healing over time.
- Shock Mote: Stuns nearby enemies.
- Reservoir Stats:
- Drain: 25 Energy
- Radius: 5m
- Duration:
- Reservoir: Infinite
- Mote: 30 seconds
- Buffs from Motes:
- Vitality:
- Health: +300
- HP Regen: 30 per second
- Haste:
- Speed: +20%
- Fire Rate: +30%
- Shock:
- Status Chance: 100%
- Range: 15m
- Targets: 5
- Vitality:
- Applicable Mods:
- Duration: Affects Mote duration
- Range: Affects Reservoir radius and Shock Mote range
- Efficiency: Affects cast Energy cost
- Strength: Affects the magnitude of each Mote buff
Wil-O-Wisp

- Cast forward a spectral image of Wisp to confuse and distract enemies.
- Reactivate the ability to travel to its position or hold to make the image move faster and teleport to its position on release.
- Wil-O-Wisp Stats:
- Drain: 50 Energy
- Duration: 4 seconds
- Time Invulnerable: 3 seconds
- Applicable Mods:
- Duration: Affects the spectral image’s duration
- Range: N/A
- Efficiency: Affects cast Energy cost
- Strength: N/A
Breach Surge

- Open a dimensional breach to overwhelm nearby enemies and cause them to release aggressive Surge sparks when damaged.
- Wisp can also target a Reservoir to teleport it and double the range of the surge.
- Breach Surge Stats:
- Drain: 75 Energy
- Radius: 18m
- Duration: 16 seconds
- Damage Multiplier: 2x
- Status Chance: 20%
- Applicable Mods:
- Duration: Affects debuff and blind duration
- Range: Affects Breach Surge radius
- Efficiency: Affects cast Energy cost
- Strength: Affects damage multiplier and status chance
Sol Gate

- Open a portal to the sun and irradiate enemies with a devastating beam of pure solar plasma.
- Holding fire increases the damage at the cost of increased energy consumption.
- Enemies damaged by Sol Gate become increasingly more vulnerable to it.
- Sol Gate Stats:
- Drain:
- Cast: 25 Energy
- Active: 12 per second
- Range: 40m
- Damage/Second: 1,500 Heat and Radiation
- Drain:
- Applicable Mods:
- Duration: Affects Energy drain while Efficiency is below 175%
- Range: Affects Sol Gate’s range
- Efficiency: Affects cast and drain Energy costs
- Strength: Affects Sol Gate’s damage
Wisp Augments

- Wisp has two augment mods available: Fused Reservoir for Reservoir and Critical Surge for Breach Surge.
- Both augment mods can be purchased from the Cephalon Suda and New Loka Syndicates for 25,000 Standing each. You’ll need to reach max rank with either Syndicate to obtain these mods.
Fused Reservoir
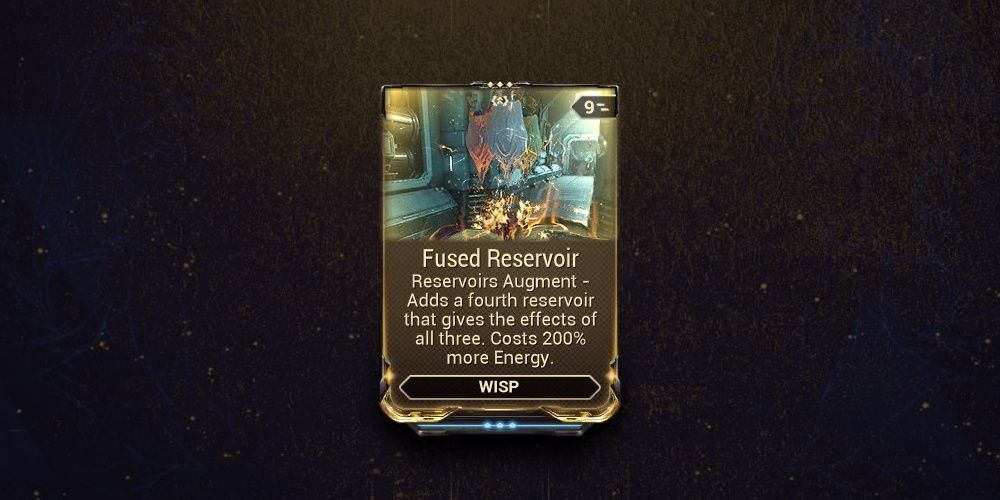
- Fused Reservoir (Exilus): Reservoirs Augment that adds a fourth Reservoir, combining the effects of all three. Costs 200% more energy.
- With Fused Reservoir, you’ll have a fourth Mote type that allows you to spawn all three Motes simultaneously. It counts as having three Reservoirs when considering the Reservoir cap. Note that this is an Exilus Mod, so it won’t take up a main Mod slot.
Critical Surge
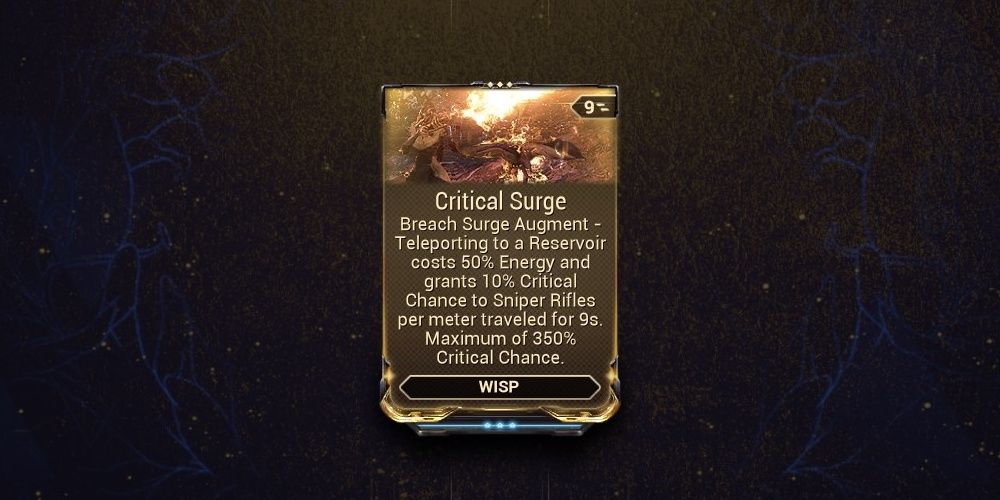
- Critical Surge: Breach Surge Augment that reduces the energy cost of teleporting to a Reservoir by 50% and grants 10% Critical Chance to Sniper Rifles per meter traveled for 9 seconds, up to a maximum of 350% Critical Chance.
- The critical chance provided by Critical Surge is multiplicative with the base critical chance, similar to Point Strike. It adds up with other critical-enhancing Mods on your weapon. For example, with this Mod, a sniper rifle can have +500% critical chance when combined with Point Strike.
- Ability Strength affects the critical chance gained per meter traveled, but not the critical chance cap. Ability Duration affects the duration of the Critical Surge buff. Refreshing Breach Surge will extend the Critical Surge buff’s duration. The energy cost reduction is not affected by Ability Efficiency.
The Best Wisp Builds

Wisp is a versatile Warframe, and we’ll cover three different builds: a starter build with no Forma, a general support build, and a min-maxed Strength build focused on maximizing Wisp’s Reservoirs.
Starter Build (0 Forma, No Subsume)
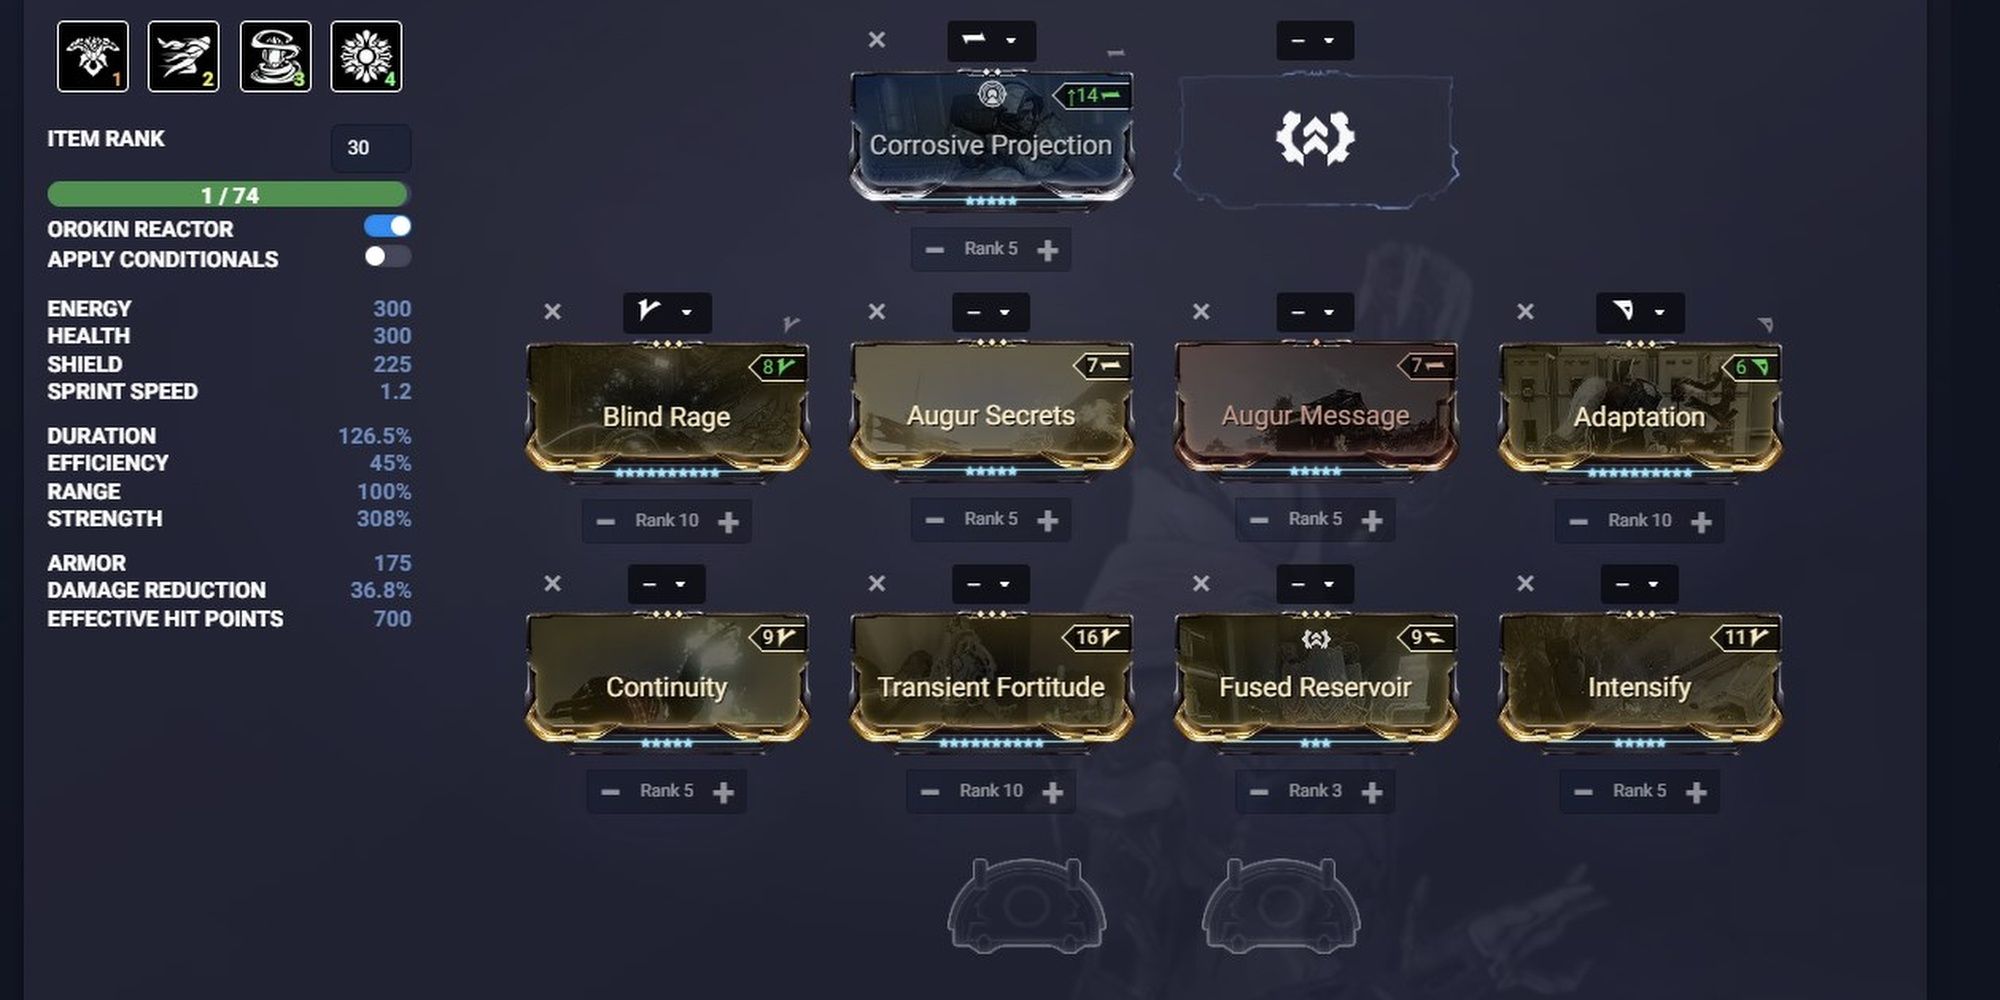
This build is for players who don’t have any Forma invested yet. It focuses on raising Wisp’s Ability Strength, allowing her Motes to provide substantial buffs. Fused Reservoir makes it more comfortable to play in non-endurance missions. If you have the Helminth system unlocked, you can consider subsuming Chroma’s Elemental Ward ability to replace Fused Reservoir.
General Support Build (4 Forma, Roar Subsume)
This upgraded build focuses on general support and includes Rhino’s Roar as a damage buff for your team. It provides high Ability Strength, Duration, and Range while maintaining efficiency. You can customize this build by replacing Roar with Grendel’s Nourish or Chroma’s Elemental Ward, depending on your preferred utility.
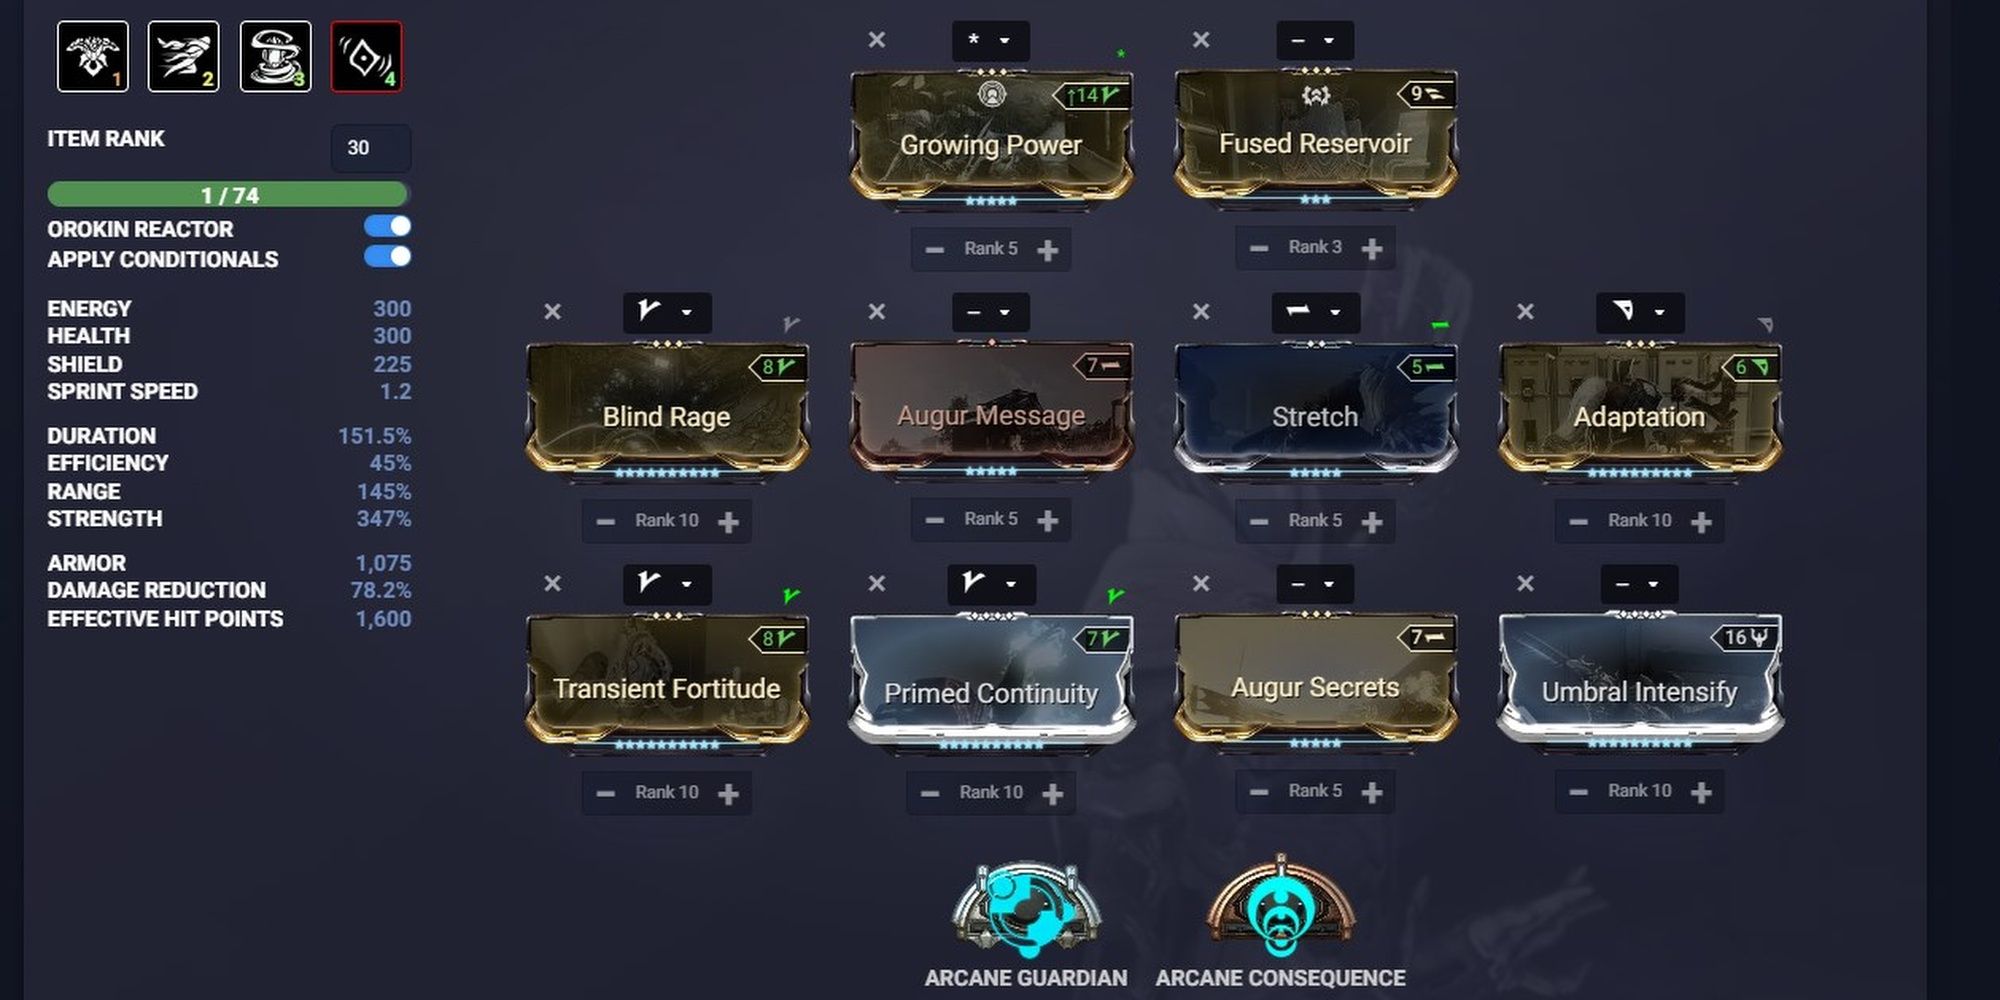
Archon Support Build (4 Forma, Nourish Subsume)
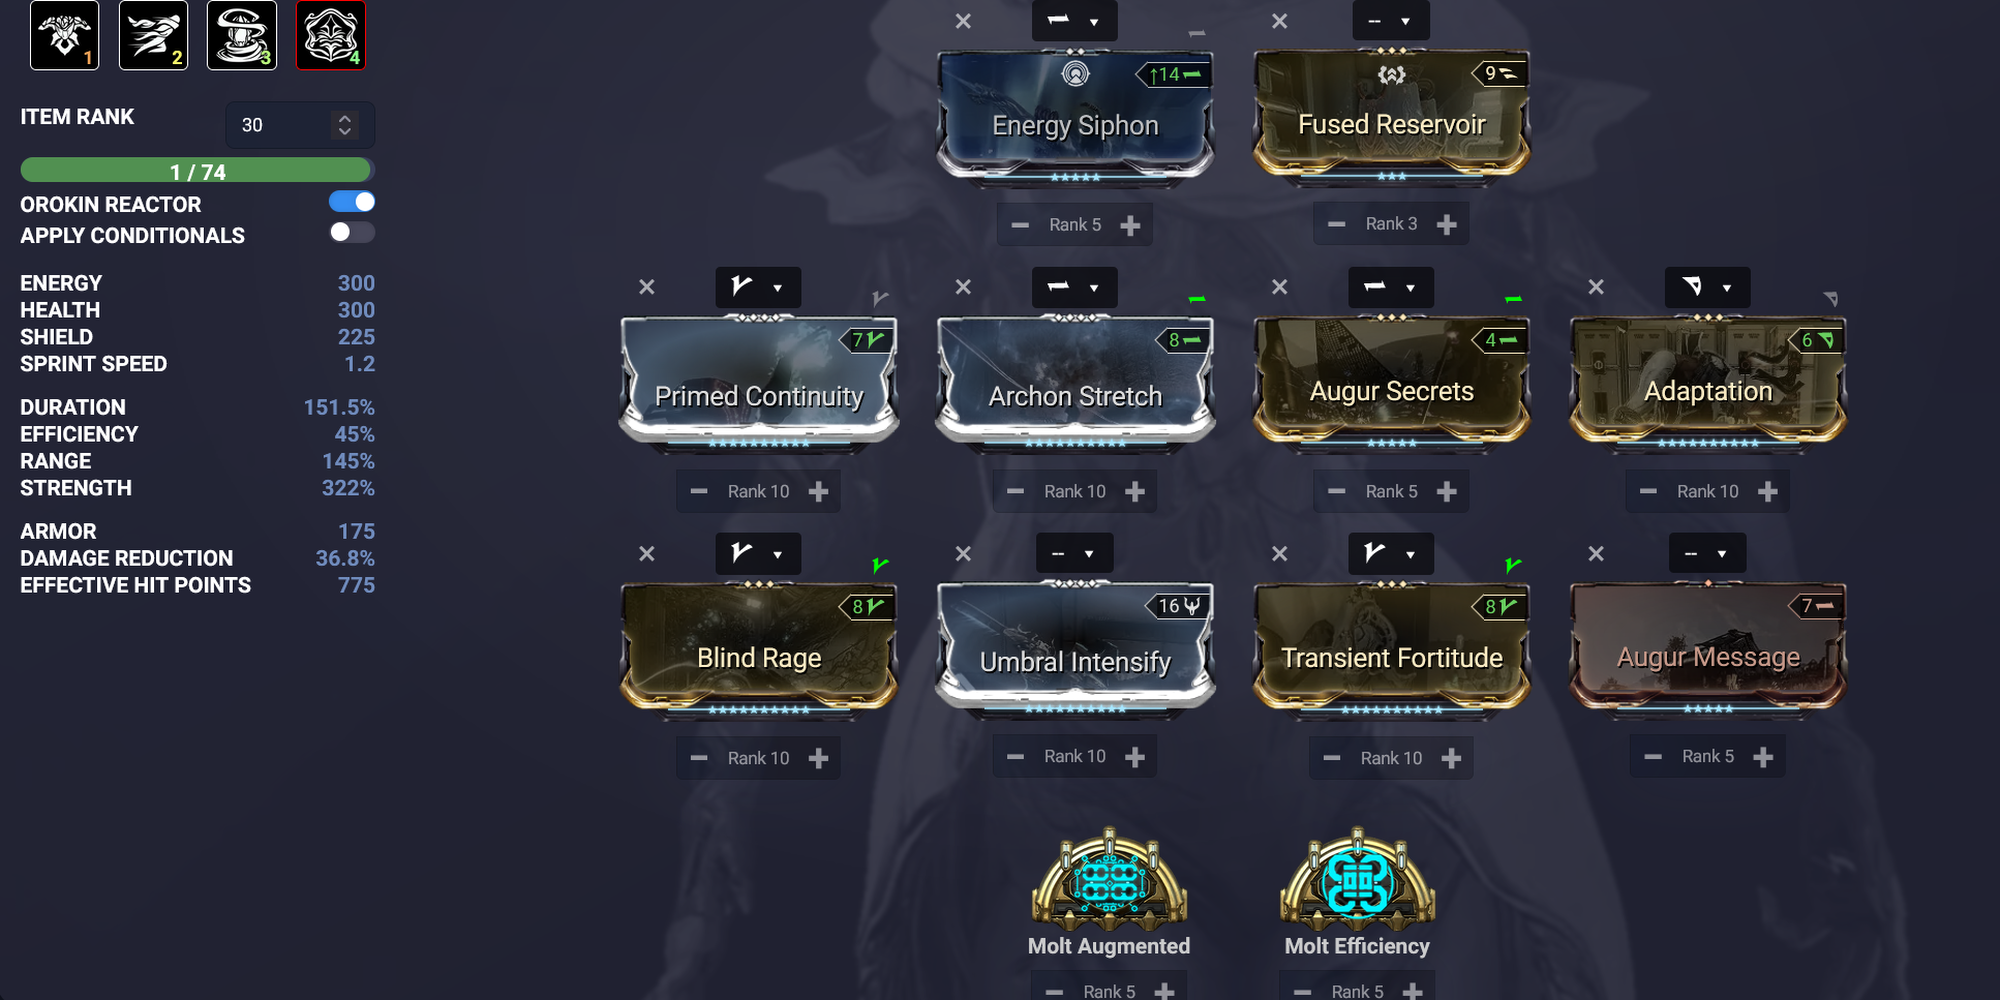
This build maximizes Grendel’s Nourish to empower Wisp’s support capabilities. It focuses on high Ability Strength and Duration, with the Energy Siphon aura and Archon Stretch to boost the Energy regeneration from Nourish. This build provides excellent sustain and energy management for your squad.
Theoretical Strongest Motes (4 Forma, Empower Subsume)
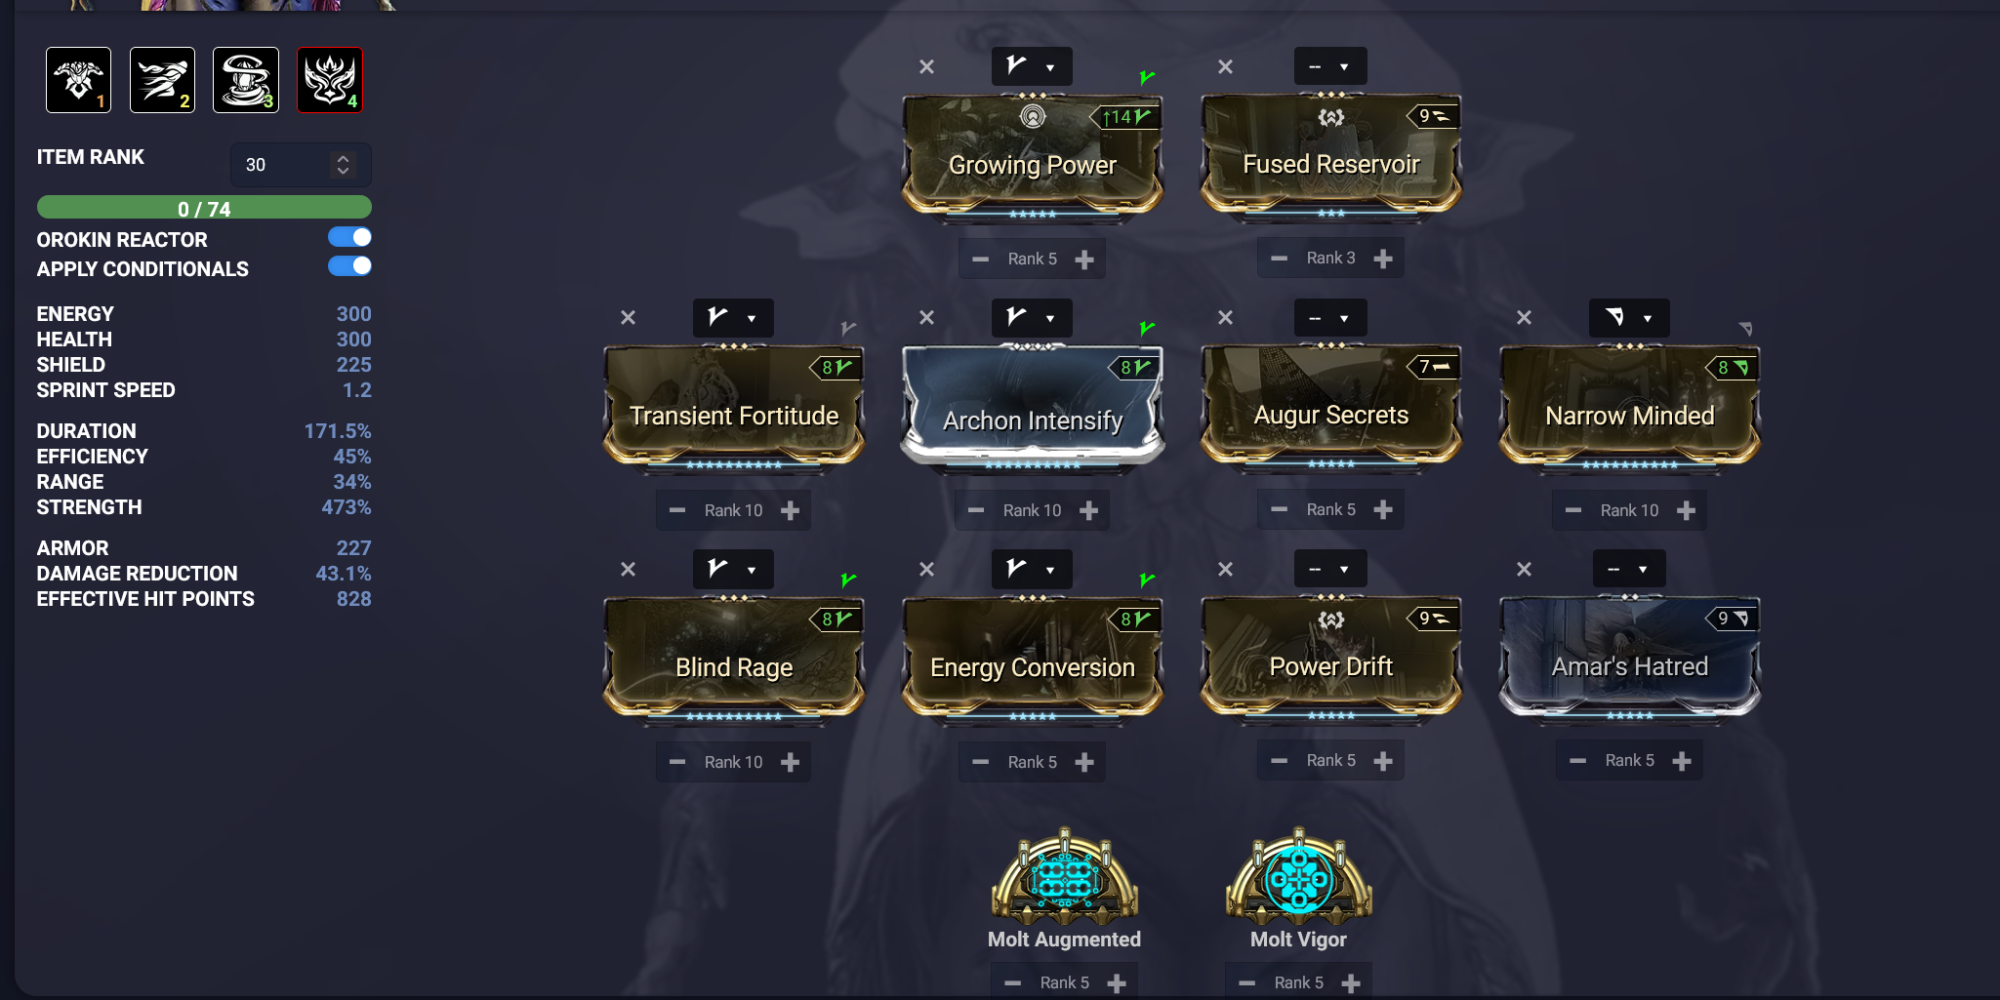
This build showcases the strongest Reservoir Motes you can achieve solo. It requires specific buffs, including Pax Bolt, Madurai Focus School, and the Power Drain Mod on your Parazon. With all buffs active, it reaches an Ability Strength of 1,040%, making your Motes incredibly potent. Keep in mind that this build requires a significant amount of effort and is not necessary for general gameplay.
Next: Warframe: Loki Complete Guide – Drops, Abilities, And Builds